ReShade has been around for a while now, and with every new version (currently 4.30) it just amazes me how well it improves most 2D games by adding some great depth.
When I picked up my Oculus Quest, and using Virtual Desktop, the first thing I wanted to do with some of my classic 2D games was convert them to 3D. I was not disappointed with the results, and on the Quest with Virtual Desktop the results are extremely impressive. Adding this 3D effect will work without a VR headset if you are still using some other form of 3D, or your monitor or TV supports native 3D.
Setting up ReShade for a game just involves a few steps and you’ll be up and running in 3D and other impressive effects in no time. There is minimal tweaking required, and you can easily uninstall ReShade for each game you apply it to. This excellent shader application does mainly use the GPU for its processing power so allow for 15% approximately increased overhead on your GPU.
Once downloaded, install ReShade and you’ll have a executable file you can run. Load the application and this will ask you to select the game executable you want to tweak. Browse to the game folder and click on it.

ReShade will try and detect the appropriate renderer (Direct x 9, Direct x 10+ or OpenGL). Any game newer than about 2007 should support Direct x 10, but for older games you’ll want to select Direct x 9. If you do select a Direct X option and ReShade doesn’t appear in game, go back and try another rendering option.

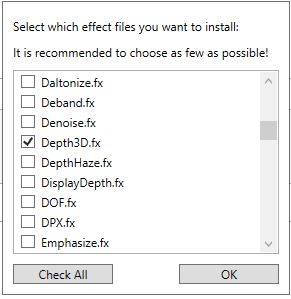
It will then ask you to confirm downloading a bunch of preset shaders – click “Yes” to this. You’ll need an internet connection for this.

Then it will show you all the shaders ticked. You do not want to tick all of these, and the recommendation is that you use as few as you need. For the purposes of this blog post, we’ll just focus on one for now – Depth3D. Uncheck all of the others, then tick on Depth3D. It will then apply that shader to your game – ready to go.
Load your game up with your VR headset on, and Virtual Desktop running. What will happen is you’ll see Reshade appear in the top left corner as the game is loading prompting you to go through the tutorial. Press “Home” on the keyboard to enter the tutorial mode. You can use your mouse to click through the tutorial.
It will then show you the Depth3D option (two actually), based on your selection earlier. The Depth3D cursor option is handy if you want to use your mouse as it will still work effectively in 3D mode. The main option that should be last in the list is Depth3D. Turn this on and you’ll see the familiar side by side of a 3D projection. You can tweak other settings in the bottom half of the Reshade screen to increase the 3D effect etc as well if you like. Click Finish to finalise the tutorial (it won’t bother you next time it loads).
Now put your VR headset on, and using Virtual Desktop press the trigger button one of your VR controllers below the virtual desktop screen. This will bring up the 3D options for Virtual Desktop. Select Half SBS (first one) and voila, you can now play that game in glorious 3D on your headset.
You can also find users pre-configurations for particular games as well. You’ll need to make sure you tick the appropriate shaders to be turned on before loading one of those files though. You can also save your own presets in the ReShade menu. Click on the “+” in the top right and you can save the Depth3D we’ve applied as a 3D preset. You can then switch between Default (with any shaders) and 3D in this example.

Note – if you don’t want to keep using ReShade or Depth3D, you can either disable the 3D effect by pressing “Home” on the keyboard and unselecting the shader, or you can remove ReShade altogether. To remove ReShade, launch the ReShade application again, search for the game executable and it will give you an option to uninstall, after selecting the renderer.
The ReShade FAQ has a lot of great troubleshooting tips as well. Give ReShade a go, and you will not be disappointed.
For any questions please feel free to leave a comment below.
Categories: Gaming, Tips & Tricks


What can be used for communication between moving the head with Quest and mouse movement?
LikeLiked by 1 person
You would have to buy Vorpx most likely to be able to do this. ReShade doesn’t easily allow this. Vorpx is a paid program but it has a lot of official profiles for non VR games (to make them VR) and their are also plenty of community profiles as well.
LikeLike